Showing posts with label Troubleshooting. Show all posts

How to improve performance when taking backup to cloud storage pools (hybrid cloud backup) - Video tutorial

Since IBM now supports various cloud storage services to take the backups, you can use cloud container storagepools to store both the deduplicated data and non-deduplicated data and restore the data as required.  Starting from IBM Spectrum Protect  (TSM) V 7.1.7, you can configure cloud-container storage pools on 4 of the popular and widely used cloud based object storage systems to backup the data. However, the backup performance of a cloud-container storage pool largely depends on the network connections between the server and the cloud. Sending data to cloud storage requires good network bandwidth along with the advanced security features. But most of the small and medium sized organisations cannot afford to buy the high network bandwidths if they want to use cloud as the storagepool destinations. 

To address this situation, IBM has introduced a new hybrid and optimised data transfer techniques. You can now define local storagepool directory by using the new DEFine STGPOOLDIRectory command where the data is stored temporarily before it is transferred to the cloud. This technique is generally referred as hybrid cloud backup. This hybrid cloud backup feature will help you to set up local storage for data that is later moved to the cloud. By assigning one or more local storage directories to a cloud-container storage pool, you can enhance the performance of backup operations to the cloud. When you back up the data to local storage, the data is buffered efficiently into disk containers and moved to the cloud as larger objects. With larger objects, you can achieve better performance results. Use this command to define one or more directories in a directory-container or cloud-container storage pool.
How to improve backup performance when taking backup to cloud storage pools

For Example: define stgpooldirectory pool1 /storage/dir1,/storage/dir2

When you define a local storage directory, data is temporarily stored in the directory during data ingestion, and is then moved to the cloud. you can set up local storage for data that is later moved to the cloud. By assigning a local storage directory to a cloud-container storage pool, you can enhance the backup performance of small objects, for example, client-transaction data.


After you define a cloud-container storage pool, create one or more directories that are used for local storage. You can temporarily store data in local storage during the data ingestion, before the data is moved to the cloud. In this way, you can improve system performance. 

Watch the below video on how to configure cloud services to configure hybrid cloud backups in 3 simple steps by using IBM Spectrum Protect and Amazon S3.

How to configure storage pool on a Cloud Storage services - Video tutorial

Starting from IBM Spectrum Protect  (TSM) V 7.1.7, you can configure cloud-container storage pools on 4 of the popular and widely used cloud based object storage systems to backup the data. IBM supports the following cloud based object storage systems to configure storagepools and to take backup of the clients and to improve server performance, simplify storage management, and secure data by using encryption.
  • Amazon S3
  • Cleversafe
  • IBM SoftLayer
  • OpenStack Swift
You can use cloud container storagepools to store both the deduplicated data and non-deduplicated data and restore the data as required. However, before configuring the cloud container storage pool, you need to get the required account information details of the cloud environment which you want to use as the destination.

Also Read: What is Cloud Container Storagepool ?

Cleversafe
If you want to configure cloud-container storage pools on Cleversafe, you must first set up a Cleversafe vault template and a Cleversafe user account, and then obtain the below configuration information.
  • CLOUDTYPE: S3
  • IDENTITY: access_key_ID
  • PASSWORD: secret_access_key
  • CLOUDURL: http://cleversafe_accesser_IP_address
Cleversafe vaults are used in the same manner as containers in a cloud-container storage pool. Set up a Cleversafe vault template to quickly create vaults with your preferred settings. After you create a vault template, use the credentials from your Cleversafe user account to configure the storage pools in the Operations Center or with the DEFINE STGPOOL command. Tivoli Storage Manager uses the Simple Storage Service (S3) protocol to communicate with Cleversafe.

Amazon S3
If you want to use Amazon Simple Storage Service for cloud container storage pool, you must obtain information from Amazon that is required for the configuration process. Amazon S3 uses buckets to store data. Amazon S3 buckets are used in the same manner as containers in a cloud-container storage pool. Tivoli Storage Manager automatically creates a bucket in Amazon for an instance of Tivoli Storage Manager, and that bucket is shared by all pools for that instance.
  • CLOUDTYPE: S3
  • IDENTITY: access_key_id
  • PASSWORD: secret_access_key
  • CLOUDURL: Specify the region endpoint URL that best fits your location, based on the Amazon AWS Regions and Endpoints page.
OpenStack Swift
Similarly if you want to use OpenStack Swift, you must obtain configuration information from the OpenStack Swift computer. Use the credentials from your OpenStack Swift account when you configure the storage pools by using the Operations Center or the DEFINE STGPOOL command.
  • CLOUDTYPE: SWIFT or V1SWIFT
  • IDENTITY: OS_TENANT_NAME:OS_USERNAME
  • PASSWORD: OS_PASSWORD
  • CLOUDURL: OS_AUTH_URL
IBM SoftLayer
Similarly, if you use IBM SoftLayer, you must obtain configuration information from the SoftLayer Object Storage page. Use the credentials from your SoftLayer account when you configure the storage pool.
  • CLOUDTYPE: SOFTLAYER
  • IDENTITY: username
  • PASSWORD: API_key
  • CLOUDURL: public_authentication_endpoint

How to configure cloud container storage pool

Once you have the above required information, you can configure the cloud container storage pool by using both Operations Center and the command-line interface. However, the preferred way to define and configure a cloud-container storage pool is to use the Operations Center as it will be easier to configure and manage. Please watch the below video to understand how to do this. 

Also Read: How to restore damaged files in a primary storagepools from replication server automatically

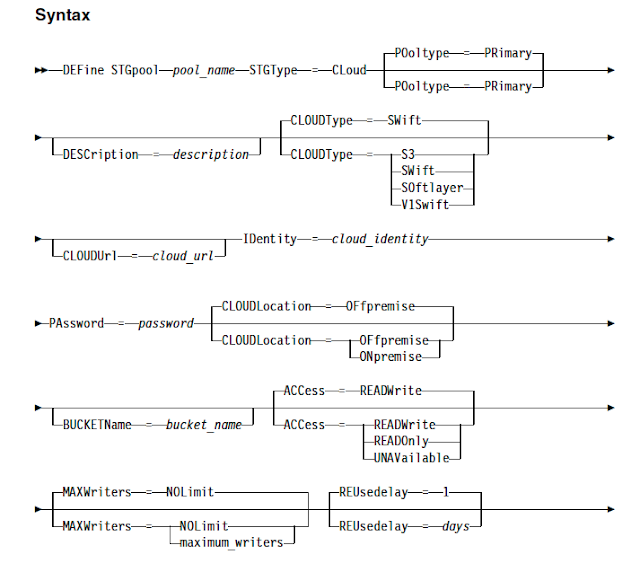
If you want to do it in a command line, use DEFINE STGPOOL command to configure cloud container storagepool in a cloud services platform.
How to configure cloud container storage pool

CLOUDType parameter specifies the type of cloud environment where you are configuring the storage pool. You can specify any one of the following values explained above. If you define a storage pool as using S3 with this parameter, you cannot later change the storage pool type by using the UPDATE STGPOOL command. If you do not specify the parameter, the default value SWIFT will be used.
CLOUDUrl specifies the URL of the cloud environment where you are configuring the storage pool. 
IDentity specifies the user ID for the cloud that is specified in the STGTYPE=CLOUD parameter. Based on your cloud provider, you can use an Access Key ID, a user name, a tenant name and user name, or a similar value for this parameter. 
PAssword specifies the password for the cloud that is specified in the STGType=CLoud parameter. Based on your cloud provider, you can use a Secret Access Key, an API Key, a password, or a similar value for this parameter.
CLOUDLocation specifies the physical location of the cloud that is specified in the CLoud parameter. You can specify OFFPREMISE or ONPREMISE if you have your own cloud setup. The default value is OFFPREMISE.
BUCKETName pecifies the name for an S3 bucket or a Cleversafe vault to use with this storage pool, instead of using the default bucket name or vault name. This parameter is optional, and is valid only if you specify CLOUDTYPE=S3

For example
define stgpool cloud_stg stgtype=cloud cloudtype=softlayer cloudurl=http://123.456.789:5000/ identity=admin:admin password=password 

Please watch the below video to configure cloud container storagepool on Amazon S3 platform by using operations center. You can use the same steps for other cloud platforms as well.

Follow these 10 tips to secure your IT backup infrastructure (Spectrum Protect)

Today, most of the IT data centres are affected by the modern and intelligent malware and viruses in some or the other form. This can be due to the negligence of the employees or inappropriate security systems that are implemented. Currently we have a new type of data theft strategies such as  RasomWare implemented by cyber attackers to steal the business critical information. This RasomWare cyber attack, have plagued many of the todays organizations inspite of the stringent security policies.

These attacks have prompted 90% of the organizations to review the way that their data protection infrastructure is managed, and to look at how they can secure their backup environments even further. And also as a backup specialist, we should also take extra care to make sure the data which is backed-up to tape or to the cloud is secure enough from the modern day cyber attacks. 

Also Read: Use these 3 methods to fix the slow and long running incremental or full backups 

To address these kind of cyber attacks, IBM recommends the below 10 security tips to implement in your backup infrastructure to prevent data theft in any form. The below video from IBM Spectrum Protect storage specialist describes the current exposure many organizations backup solutions have, and discusses methods to reduce their security exposure. It proposes solutions to further protect the data protection core components so they, themselves, are not destroyed along with the primary data.

The below video will cover how to:
  • Harden the Spectrum Protect server hosts

  • Protect Spectrum Protect servers against RansomWare and other Malware
  • Secure the communication pathways
  • Secure Spectrum Protect administration 
  • Secure Spectrum Protect client nodes
  • Use all support and alerting tools available to you and apply Flashes
  • Follow strong testing and currency policies
  • Validate Data Protection and DR Services
  • Make the Protect Server infrastructure easier to manage reliably
  • Make the Protect Clients easier to manage reliably
The below video also covers how the security settings are configured in many TSM servers today and the different types of Security models offered by IBM Spectrum Protect which can be implemented in your backup setup.

Also Read: IBM Spectrum Protect V8 new features

How to repair damaged data on the directory-container storage pool on a target server

IBM has introduced new set of commands to easily repair the damaged data on the directory-container storage pool on both source and target TSM servers when you enable replication techniques. By using these commands you can save lots of time and money which we spend on recovering the damaged storage pools earlier. You can use PROTECT STGPOOL, AUDIT CONTAINER and REPAIR STGPOOL commands to repair the damaged data on the directory-container storage pool on the target TSM servers. 

The repairing process of the directory-container storage pool  on the target server is done automatically by using the above commands. If the damaged data extent was backed up on a directory-container storage pool on the target server, you can repair the data extent manually by using the REPAIR STGPOOL command. Information about what is repaired is recorded in the activity log for the target server. However, the automatic repair process has the following limitations:
  • Both the source server and the target server must be at V7.1.5 or later.
  • To be repaired, extents must already be marked as damaged on the target server. The repair process does not run an audit process to identify damage.
  • Only target extents that match source extents are repaired. Target extents that are damaged but have no match on the source server are not repaired.
  • Extents that belong to objects that were encrypted are not repaired.
  • The timing of the occurrence of damage on the target storage pool and the sequence of REPLICATE NODE and PROTECT STGPOOL commands can affect whether the repair process is successful. Some extents that were stored in the target storage pool by a REPLICATE NODE command might not be repaired.

So to repair the damaged data, you need to first find out what is the damaged data in the target storage pool. To identify the damaged data, we use AUDIT CONTAINER command and QUERY DAMAGED commands. The AUDIT CONTAINER command is used to scan for inconsistencies between database information and a container in a directory-container storage pool. Whereas QUERY DAMAGED command is used to display information about damaged data extents in a directory-container or cloud-container storage pool. Use this command together with the AUDIT CONTAINER command to determine a recovery method for the damaged data.

Steps to follow to repair damaged data on the directory-container storage pool on the Target server

Step 1: Verify the consistency of database information for a directory-container on the target TSM server

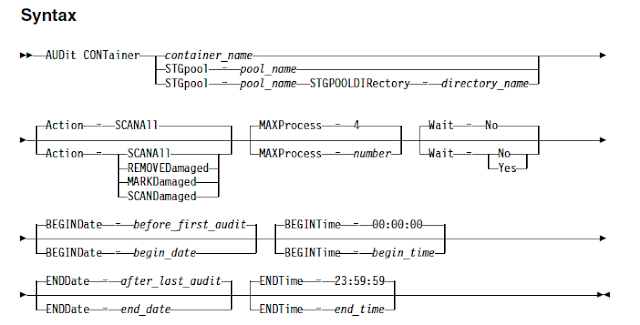
Use AUDIT CONTAINER  command to scan for inconsistencies between database information and a container in a directory-container storage pool. You can use this command to complete the following actions for a container in a directory-container storage pool
  • Scan the contents of a container to validate the integrity of the data extents
  • Remove damaged data from a container
  • Mark an entire container as damaged


You can Specify the name of the container or the the name of the directory-container storage pool or the  name of the container storage pool directory that you want to audit.  For example, to mark as damaged all of the data in a directory-container storage pool
audit container stgpool=prdpool maxprocess=5 action=markdamaged

Also you can specify the type of action to be performed when using this command by using Action parameter. It specifies what action the server takes when a container in a directory-container storage pool is audited. It has the following options
SCANAll - Specifies that the server identifies database records that refer to data extents with inconsistencies. This value is the default. The server marks the data extent as damaged in the database.
REMOVEDamaged - Specifies that the server removes any files from the database that reference the damaged data extent.
MARKDamaged - Specifies that the server explicitly marks all data extents in the container as damaged.
SCANDamaged - Specifies that the server checks only the existing damaged extents in the container.


If the audit does not detect an error with a data extent that is marked as damaged, the state of the data extent is reset. The data extent can then be used. This condition provides a means for resetting the state of damaged data extents if errors are caused by a correctable problem. The SCANALL and SCANDAMAGED options are the only options that reset a damaged extent if it is found not to be damaged.

Step 2: Query damaged data in a directory-container or cloud-container storage pool - optional

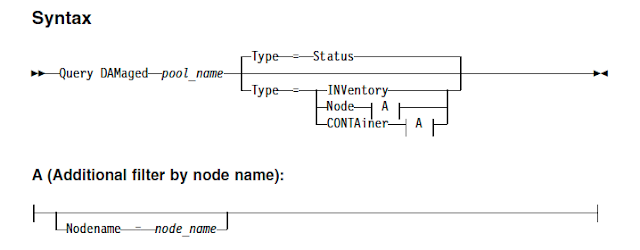
Use QUERY DAMAGED command to display information about damaged data extents in a directory-container or cloud-container storage pool. Using this command together with the AUDIT CONTAINER command will help you to determine a recovery method for the damaged data.
For example, to display status information about damaged or orphaned data extents
query damaged prdpool type=status

Storage Pool     Non-Deduplicated          Deduplicated   Cloud Orphaned   Name             Extent Count                     Extent Count      Extent Count  ---------------         -------------                           ----------             -------------POOL1                  65                                       238                     18

Use the Type parameter to specify the type of information to display. You can use the following options
Status - Specifies that information is displayed about damaged data extents. For cloud storage pools, orphaned extents are also displayed. This is the default.
Node Specifies that information about the number of damaged files per node is displayed.
INVentory - Specifies that inventory information for each damaged file is displayed.
CONTAiner - Specifies that the containers that contain damaged data extents or cloud orphaned extents are displayed. For directory-container storage pools, storage pool directories are also displayed.
Nodename - Specifies that damaged file information for a single node is displayed.

Step 3: Automatic Repair of damaged extents 

Starting from Tivoli Storage Manager Version 7.1.5, when a storage pool protection process runs for a directory-container storage pool on a source server, damaged extents in the target server's storage pool are repaired automatically. 

You can check the information about what is repaired is recorded in the activity log for the target server once the storage pool protection process gets completed. Ideally it is recommended to schedule the step 2 and step 3 in regular intervals so that the damaged data extents are automatically repaired during daily storagepool protection process.

How to repair damaged data on the directory-container storage pool on a source server

IBM has introduced new set of commands to easily repair the damaged data on the directory-container storage pool on both source and target TSM servers when you enable replication techniques. By using these commands you can save lots of time and money which we spend on recovering the damaged storage pools earlier. You can use PROTECT STGPOOL, AUDIT CONTAINER and REPAIR STGPOOL commands to repair the damaged data on the directory-container storage pool on both source and target TSM servers. 

Infact, the repairing process of the directory-container storage pool  on the target server is done automatically by using the above commands. In this post we will see the steps to repair damaged data on the directory-container storage pool on a source server.

Steps to follow to repair damaged data on the directory-container storage pool on a source server

Step1: Enable protection manually or automatically

You can protect the storagepools by configuring automatic protection or manual protection. 
To enable storagepool protection automatically, specify the PROTECTSTGPOOL parameter on the DEFINE STGPOOL or UPDATE STGPOOL command to back up the data. For example
update stgpool prodpool protectstgpool=proddrpool

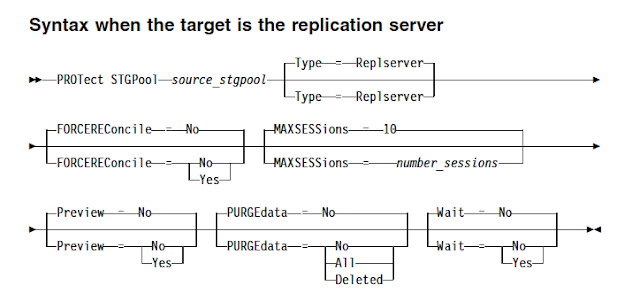
To enable storagepool protection manually, use PROTECT STGPOOL command to protect data in directory-container storage pools by storing the data in another directory-container storage pool on the target server. When you issue this command, data that is stored in the directory-container storage pool on the source server is backed up to a directory-container storage pool on the target server. You should issue this command on the server that is the source server for data.
How to repair damaged data on the directory-container storage pool on a source server

For example to protect a storage pool to a target replication server
protect stgpool devpool maxsessions=5

Use the FORCEREConcile parameter to specify whether to reconcile the differences between data extents in the directory-container storage pool on the source server and target server. If you specify NO to this option, the data backup does not compare all data extents in the directory-container storage pool on the source server with data extents on the target server. Instead, data backup tracks changes to the data extents on the source server since the last backup and synchronizes these changes on the target server. If you specify YES, the data backup compares all data extents on the source server with data extents on the target server and synchronizes the data extents on the target server with the source server.

Step 2: Repair the storagepool by using REPAIR STGPOOL command

If you notice any damage of data on the source storagepool, you can repair the storagepool by using REPAIR STGPOOL command


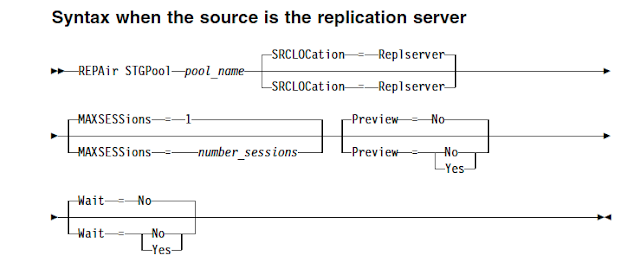
By protecting the directory-container storage pool, you can repair damaged storage pools by using the REPAIR STGPOOL command. It is used to repair deduplicated extents in a directory-container storage pool. Damaged deduplicated extents are repaired with extents that are backed up to the target server. 
repair stgpool command

For example, to repair a storage pool 
repair stgpool devpool maxsessions=5

You must issue the PROTECT STGPOOL command to back up data extents to the directory-container storage pool on the target server before you issue the REPAIR STGPOOL command. The REPAIR STGPOOL command fails when any of the following conditions occur:
  • The target server is unavailable.
  • The target storage pool is damaged.
  • A network outage occurs.

Limitations of enabling compression on TSM DB backups

Deduplication and replication techniques are server intensive processes and if you enable these techniques, you might additionally notice that your TSM DB size has been increased rapidly. If you are taking DB backups on a FILE or SERVER device class, it is obvious that you might require additional space to store the multiple versions of DB backups. This situation costs lots of disk space for the organizations and it might necessary to store the DB backups on disks if you have stringent recovery times. 

So in this kind of situations, you can enable compression when taking TSM DB backups.  By compressing volumes that are created during database backups, you reduce the amount of space that is required for your database backups.

How to enable compression for TSM DB backups

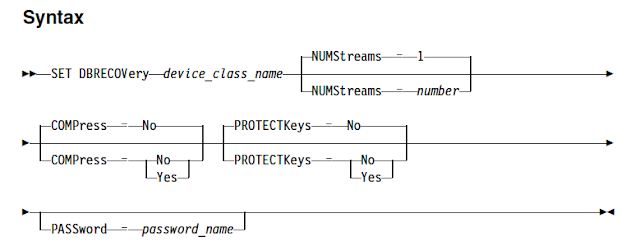
You can enable compression while running BACKUP DB command manually or you can enable the compression setting for all the DB backups by using SET DBRECOVERY command. For example, to enable compression for a full DB backup taking on to FILE device class
backup db devc=FILE type=full compress=yes


And the syntax for enabling compression for all backups automatically is


By default, the compress value is NO as shown above. You need to specify YES, to enable compression automatically for all DB backups. If you specify the COMPRESS parameter on the BACKUP DB command, it overrides any value that is set in the SET DBRECOVERY command. Otherwise, the value that is set in the SET DBRECOVERY command is the default.

Also Read: Taking TSM server DB backup when the server is down

Limitations of enabling compression during DB backup

  • This feature is valid only if you are planning to take DB backup on to a disk storage, generally FILE device classes. 
  • Using compression during database backups can reduce the size of the backup files. However, compression can increase the time that is required to complete database backup processing.
  • Also, it might take extra time to decompress the DB backup files during TSM DB restore. This will put additional pressure if it is a disaster recovery situation. The whole purpose of this setting is to save storage space only, not to increase DB backup performance.
  • Do not back up compressed data to tape. If your system environment stores database backups on tape, set the COMPRESS parameter to No in the SET DBRECOVERY and BACKUP DB commands.

Protecting directory-container storage pool by using new type of copy storagepool

IBM has frequently adding new features to Tivoli Storage Manager after they changed its name to IBM Spectrum Protect.  The 2 new storage pool types which are Directory Container Storagepool and Cloud Container storage pool types helps us to deduplicate data faster and also backup to cloud. 

Starting from Tivoli Storage Manager Version 7.1.7, another new storage pool type is added by which you can protect directory-container storage pools by copying the data to container-copy storage pools, where the data can be stored on tape volumes. Previously, you can only protect the data in directory-container storage pools by enabling replication. With this new type of storage pool, you can now copy data from directory-container storage pools to tape to send it to offsite location if required. 

Container-copy storage pool Overview

A container-copy storage pool is a new type of storage pool that provides an alternative to using a replication server to protect data in a directory-container storage pool. Container-copy storage pools can be used to repair minor to moderate directory-container storage pool damage, which includes damaged containers or directories. However, replication is the only way to provide complete disaster recovery protection for directory-container storage pools. With replication, you can directly restore client data from the target server if the source server is unavailable. You cannot create container-copy storage pools if you are using replication.

Also Read: What is Directory Container Storagepool ?

As per IBM, It is not recommended to use container-copy storage pools for disaster recovery protection, even in a small configuration. Repairing an entire directory-container storage pool, even for a small backup configuration, can take several days. Adding more drives or using the latest generation of tape technologies does not decrease the time that is required for the repair activity.

Also Read: What is Cloud Container Storagepool ?

Now lets see how to configure container-copy storage pool in both command line and Operations Center by using wizards.

Configuring container-copy storage pool by using commandline

1) To configure container-copy storage pool, you should first define at least one tape library to the server by using the DEFINE LIBRARY command. Provision enough tape drives and scratch volumes to meet your storage requirements. Also remember that Virtual tape libraries are not supported, regardless of which library type is defined. Only physical tape is supported.

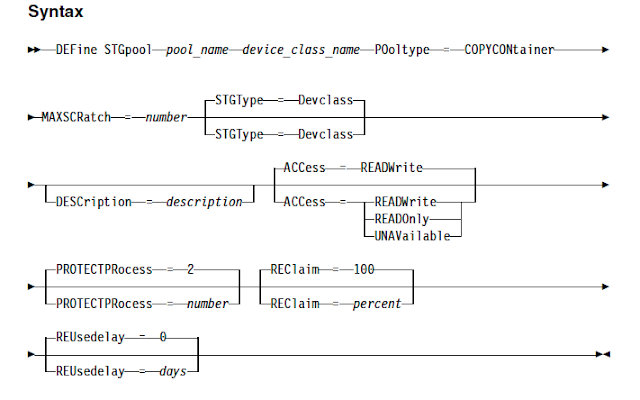
2) Next you need to define container-copy storage pool by using DEFine STGpool command. Use the below syntax and optional parameters to define this

For example, 
define stgpool container_copy LTO6 pooltype=copycontainer maxscratch=100 reusedelay=30

PROTECTPRocess specifies the maximum number of parallel processes that are used when you issue the PROTECT STGPOOL command to copy data to this pool from a directory-container storage pool.

Also Read: TSM Storage Pool Concepts (V7 Revised)

3) Then you need to define or update the directory container storage pool with the container-copy storage pool to be used for protection. You need to update PROTECTLOCalstgpools parameter with the copy container storage pool name which you defined earlier. This will help you to automatically schedule the protection. 
update storagepool directory_stgpool  PROTECTstgpool =container_copy

PROTECTLOCalstgpools parameter specifies the name of the container-copy storage pool on a local TSM server where the data is backed up. You should update this parameter with copy container storage pool while defining the directory container storage pool. This container-copy storage pool will be a local target storage pool when you use the PROTECT STGPOOL command.

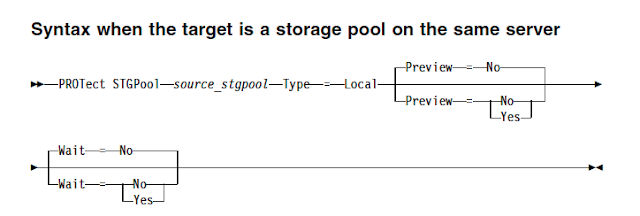
4) Next you can define a schedule, or use PROTECT STGPOOL command to manually protect the data in a directory-container storage pool by storing a copy of the data in the container copy storagepool.


For example
protect stgpool directory_stgpool  type=local

Configuring container-copy storage pool by using Operations Center

To configure storage pool protection to tape for an existing directory-container storage pool by using Operations Center, complete the following steps:
  • On the Operations Center menu bar, click Storage > Storage Pools.
  • On the Storage Pools page, select the directory-container storage pool that you want to protect to tape.
  • Click More > Add Container-Copy Pool.
  • Follow the instructions in the Add Container-Copy Pool window to schedule protection to tape.
Note that to copy the data in directory-container storage pools to tape, the Operations Center creates a schedule to run the PROTECT STGPOOL command. When the protection schedule runs, one tape copy is created. At least one volume must be available when the protection schedule runs. Otherwise, the operation fails.

Also Read: How to restore damaged files in a primary storagepools from replication server automatically

If you created a container-copy storage pool as part of the Add Storage Pool wizard, you do not have to use this procedure. When you completed the wizard, the Operations Center configured the container-copy storage pool and a protection schedule.

Check the below video to understand how to configure Container-Copy Pool and define a schedule to start protecting data in directory container storagepool by using OC wizards.

How to enable Archivelog Compression and how much storage space you can save

The TSM Archive log contains all the committed transactions of TSM DB and they are later moved to the TSM DB after the successful full DB backup. If you enable deduplication and replication techniques in your environment, it is possible that your archivelog size might frequently gets to 90%. Because of this condition, you need to schedule frequent full TSM DB backups to empty the archivelog directory. 

However, scheduling frequent TSM DB backups is not practically possible in medium or large sized TSM servers. The only way is to cancel the background server processes which are generating large transactions into the active log and archivelog for some time and then resume the processes again after successful full DB backup completion.


To ease this kind of situations, from Tivoli Storage Manager Version 7.1.1, you can enable compression of the archive log files that are written to the archive log directory. You can both enable or disable compression of archive logs on the Tivoli Storage Manager server at any time. By compressing the archive logs, you reduce the amount of space that is required for storage. You also reduce the frequency with which you must run a full database backup to clear the archive log.

How to enable compression for the Archive logs

Before you configure compression of archive logs, you must also consider the pros and cons of this feature. Since every TSM server has different hardware and software settings, the results that you achieve might differ, depending on the size of the archive log files. As per IBM testing results, If you enable archive log compression, you can get 57% of Archive log storage space reduction on Linux servers and whereas you can achieve 62%  of storage savings on windows servers.

Also you must be careful if you enable the ARCHLOGCOMPRESS server option on systems with sustained high volume usage and heavy workloads. Enabling this option in this system environment can cause delays in archiving log files from the active log file system to the archive log file system. This delay can cause the active log file system to run out of space. Be sure to monitor the available space in the active log file system after archive log compression is enabled.


If at anytime, the active log directory file system usage nears out of space conditions, the ARCHLOGCOMPRESS server option must be disabled by using the SETOPT command to immediately without halting the server.

You can enable archive log compress offline and online

To enable compression of the archive log files when the server is offline, include the ARCHLOGCOMPRESS server option in the dsmserv.opt file and restart the server. The ARCHLOGCOMPRESS server option specifies whether log files that are written to the archive directory for logs are compressed.
How to enable Archivelog Compression and how much storage space you can save
You can also enable archive log compression when the server is up and up and running by issuing the SETOPT  ARCHLOGCOMPress command as YES.

You can verify that compression is enabled by issuing the QUERY OPTION ARCHLOGCOMPRESS command.

How to enable different policy settings for the replicated data on the replication server

Node replication is the process in which the data that belongs to the specified client nodes or node groups is replicated from the source/production site to the target/DR site according to the replication rules that are previously defined. By default, the client node data on the target replication server was managed by policies defined on the source replication server. Files that are no longer stored on the source replication server, but that exist on the target replication server, are deleted during next scheduled replication process.

Taking this technique to the next level, IBM has given a new option where you can manage the data on replication server with customised retention settings. Starting from Tivoli Storage Manager Version 7.1.1, you can use the policies that are defined on the target replication server to manage replicated client-node data independently from the source replication server. When this feature is enabled, you can use the policies on the target replication server to 
  • Maintain more or fewer versions of replicated backup files between the source and target replication servers.
  • Retain replicated archive files for more or less time on the target replication server than they are being maintained on the source replication server.
Also Read: Understanding Management Class Binding and Management Class Rebinding

But to enable this feature, you must install Tivoli Storage Manager V7.1.1 on the source and target replication servers and then you must use the new command VALIDATE REPLPOLICY to verify the differences between the policies for client nodes on the source and target replication servers. Then, you can enable the policies on the target replication server.

Procedure to enable different policy settings on the replication TSM server

First, you must ensure that the policies that are defined on the target replication server are the policies that you want to manage replicated client-node data. Once you decide the policy settings which needed to be enabled on replication server, follow the below procedure to validate and enable the policy settings on the replication server.

1) Before you use the policies that are defined on a target replication server, you must issue the VALIDATE REPLPOLICY command for that target replication server. 
How to enable different policy settings for the replicated data on the replication server
This command displays the differences between the policies for the client nodes on the source replication server and policies on the target replication server. 

For example, to determine whether there are differences between the policies on the source replication server and the policies on the target replication server, DRTSM2, issue the following command
VALIDATE REPLPOLICY DRTSM2
Example Output:

Policy domain name on this             Policy domain name on target         Target server name                
Differences in backup copy group     STANDARD in management class       STANDARD
Change detected                                    Source server value                    Target server value
--------------------------------                         --------------------------------               -------------------
Versions data exists                                          2                                                8


Affected nodes                                                         
---------------------------------------------------------------------------
NODE1,NODE2,NODE3,NODE4,NODE5

Review the output of the command to determine whether there are differences between the policies on the source and target replication servers. Modify the policies on the target replication server as needed.

Also Read: How TSM Server determines the eligibility of files during different types of backup ?

2) Next, enable the target replication server policies by issuing the SET DISSIMILARPOLICIES command on the source replication server. 
How to enable different policy settings for the replicated data on the replication server
For example, to enable the policies on the target replication server, DRTSM2, issue the following command
SET DISSIMILARPOLICIES DRTSM2 ON

This command will enable the policies that are defined on the target replication server to manage replicated client-node data. If you do not use the policies on the target replication server, replicated client-node data is managed by policies on the source replication server by default.

How to restore damaged files in a primary storagepools using replication technique

Traditionally we use copy storagepool tapes to restore the damaged files in a primary storagepools. Initially we need to find which files are damaged in the primary storagepool and also find which copy storagepool tapes are needed from offsite in order to fix the damaged files. This procedure is a time consuming process as there is lot of physical activity and dependancy involved in it. To overcome this issue, starting from IBM TSM V7.1.1 we can automatically recover damaged files from a replication server if replication is enabled. When this feature is enabled, the system detects any damaged files on a source replication server and replaces them with undamaged files from a target replication server.

With Tivoli Storage Manager Version 7.1.1 and above versions, you can use node replication processing to recover damaged files. You can use the replication process to recover damaged files from that server. You can specify that the replication process is followed by an additional process that detects damaged files on the source server and replaces them with undamaged files from the target server.

You can also enable this feature for specific client nodes. With REGISTER NODE command or with the UPDATE NODE command you can specify whether data from damaged files is recovered automatically during the replication process. You can also specify a parameter on the REPLICATE NODE command for a single replication instance, you can start a process that replicates the node and recovers damaged files. Alternatively, you can start a replication process for the sole purpose of recovering damaged files.


After the node replication process is completed, a recovery process can be started on the target replication server. Files are recovered only if all the following conditions are met:
  • Tivoli Storage Manager, Version 7.1.1 or later, is installed on the source and target replication servers.
  • The REPLRECOVERDAMAGED system parameter is set to ON. The system parameter can be set by using the SET REPLRECOVERDAMAGED command.
  • The source server includes at least one file that is marked as damaged in the node that is being replicated.
  • The node data was replicated before the damage occurred.

Steps to restore or recover damaged files in the primary storagepools

1) First check the setting for recovering damaged files from a target replication server is turned on by issuing QUERY STATUS command
query status

For the above output, Recovery of Damaged Files parameter value should be ON. If the setting for recovering damaged files is OFF, turn it on by issuing the SET REPLRECOVERDAMAGED command and specifying ON
set replrecoverdamaged on

If the REPLRECOVERDAMAGED system parameter is set to OFF, and you change the setting to ON, an automatic scan of the Tivoli Storage Manager system is started. You must wait for the process to be completed successfully before you can initiate the recovery of damaged files by using the REPLICATE NODE command.

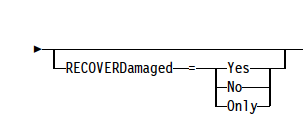
2) Now we can use REPLICATE NODE command with RECOVERDAMAGED parameter to recover the damaged files. When trying to recover the damaged files, you can use RECOVERDAMAGED parameter to run the full node replication process for a node or node-group and then recover the damaged files or you can only recover the damaged files without initiating a full node replication process. 
RECOVERDAMAGED parameter

For example, to run the full node replication process and recover damaged files for client nodes in the PROD group, issue the following command:
replicate node PROD recoverdamaged=yes

For example, to recover damaged files for client nodes in the PROD group without running the full node replication process, issue the following command:
replicate node PROD recoverdamaged=only

Note that the RECOVERDAMAGED parameter of the REPLICATE NODE command overrides any value that you specify for the RECOVERDAMAGED parameter at the node level.